
|
|
PHOTO |

This option allows you to create photorealistic images of the design.


Once the project has been finished, proceed to making the render with the lights and perspective you want.
The window below will let you configure the render options:
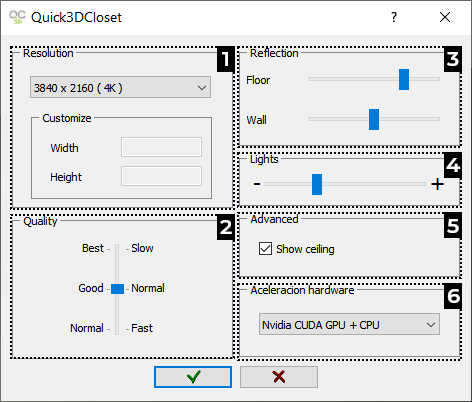
The available options are:
- Resolution: Increasing the resolution will increase definition. If you select the “Customize” option, you will have to add width and height values manually:

NOTE: To save time, it is recommended to do the tests in low resolution and increase it when the outcome is as expected. If the lines of the door frame are staggered, it will be necessary to increase the resolution.
- Quality: There are 3 available options: Best, Good and Low. The best quality will take more time to render. Below you can see images of the 3 qualities available:
|
LOW / FAST |
GOOD / LOW |
BEST / SLOW |
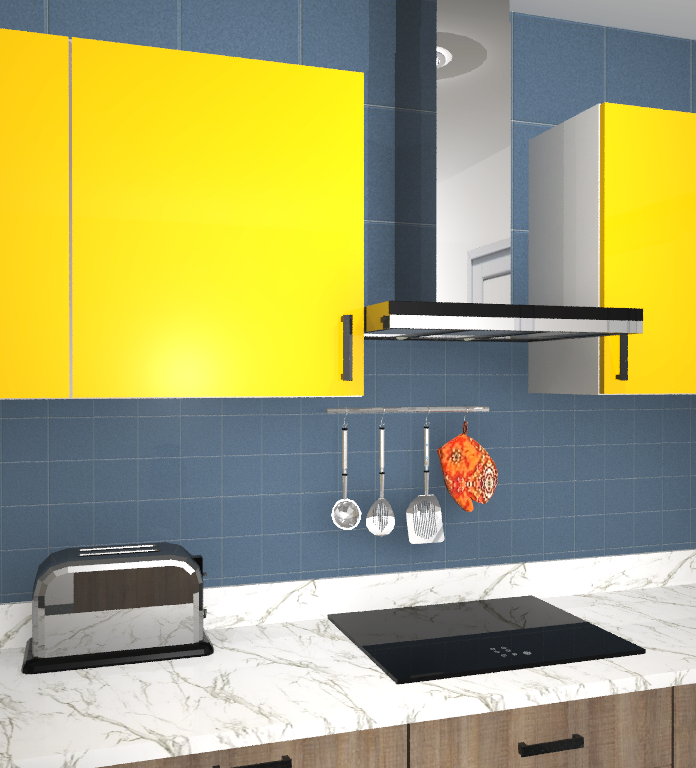


- Reflection: Here you can increase or decrease the reflection in floors and walls. (NOTE: the reflection value changes the light. The higher the reflection is, the more light the render will have.)
Below you can see two images of the same project: one without reflection and the other with maximum reflection values:
|
|
|
|


- Lights: This option allows you to increase or decrease the lights of the render. (NOTE: If it looks good in "3D mode" but the render is light or dark, it is easier to adjust the lights using this bar. When changing "Quality", it may also be necessary to readjust the lights a bit by using this option.)
- Advanced: This section allows you to configure advanced aspects of the render such as:
- Show ceiling: This option will show the ceiling in the render.
- Hardware acceleration: Hardware acceleration is only possible with compatible graphics cards, specifically from the Nvidia RTX 3050 family and higher. Hardware acceleration will be available only for the slow and very slow rendering modes.
- None: No hardware acceleration. Exclusive use of the CPU for scene generation.
- Nvidia OptiX GPU: The render will utilize NVIDIA's OptiX technology whenever the graphics card is compatible. This hardware acceleration option has a significant impact on scenes with high reflection and refraction loads.
- Nvidia CUDA GPU: CUDA stands for Compute Unified Device Architecture. It allows offloading the calculations necessary for rendering to the graphics card processors, relieving the CPU. The use of CUDA acceleration is recommended for simple scenes with few reflections or when the card is not compatible with OptiX technology.
- Nvidia CUDA GPU + CPU: Hardware acceleration will be used through CUDA technology in parallel with the CPU.
After setting up all the render parameters, click on ( ), and a new window opens (V-Ray Frame Buffer) where the render itself will be created. It may take some time to open the window, depending on the complexity of the kitchen.
This window allows you to:
- See a color render in progress.
- Save the color render, once completed.
- Apply color corrections to the rendered image such as exposure, contrast, saturation and many others.
- See a list of renders created and review past renders individually or two at a time.
- Save information about the rendered images such as time it took and others.
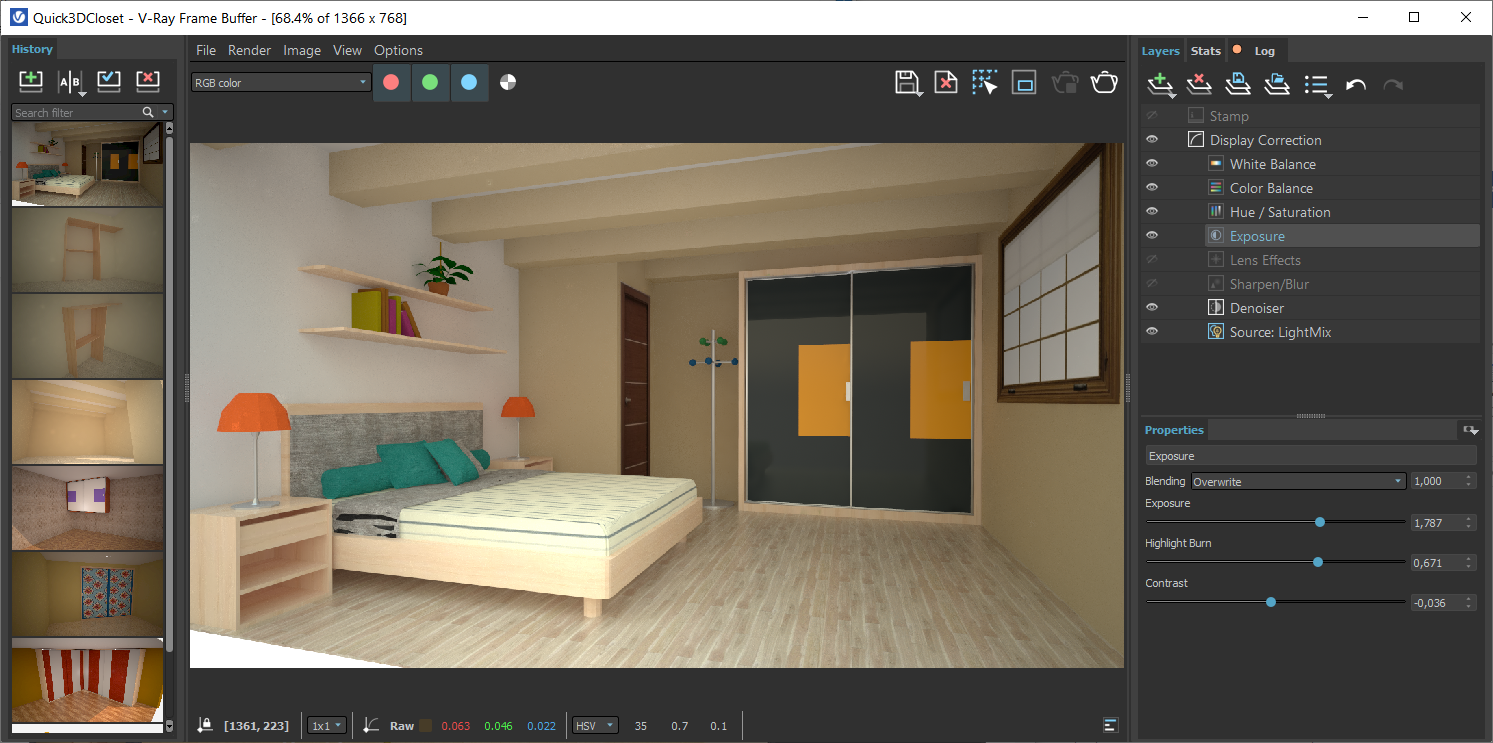
The options in this window are explained in the “Edit Photos” section.
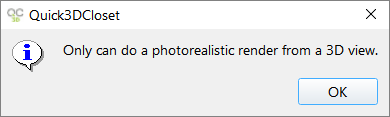
NOTE: If you click on the render button during a "2D view", the window below will appear:
NOTE 2: Clicking on the "Photo" option with the "multiple window" mode will ask you which one you want to "render":

|
|
|


When you click on this button, the following window will display with all the "renders" made to compare the parameters and the final result. Notice that once the project has been closed, this list will disappear, so you may have to save the render(s) you want. (NOTE: If no render has been made, the window will not be displayed):

Here you can find the following options:
- List of images: A list with all the renders made and their parameters (quality, resolution, lights, etc) will be shown on the left.
- Preview: A preview of the selected render will be shown on the right.
- Save as, edit and remove image buttons: Here are the commands to edit, save and delete a selected image:
|
Once edited, click on the "Accept" (
|
|
|
|
|


- Zoom buttons: These commands allow you to increase or decrease the image size in the preview [2]:
|
|
|
|


|
|
|
When clicking on the "Photo" button to generate a photo-realistic image or when clicking on "Edit photos", the “V-Ray Frame Buffer” window opens with the following features:
- See a color render in progress if you clicked on "Photo".
- Save the color render, once completed.
- Apply color corrections to the rendered image such as exposure, contrast, saturation and many others.
- See a list of renders created and review past renders individually or two at a time.
- Save information about the rendered images such as time it took and others.
NOTE: To 'load' the image, double-click on it in the 'History' field [4]. This will allow it to be edited using the tools available in [5].
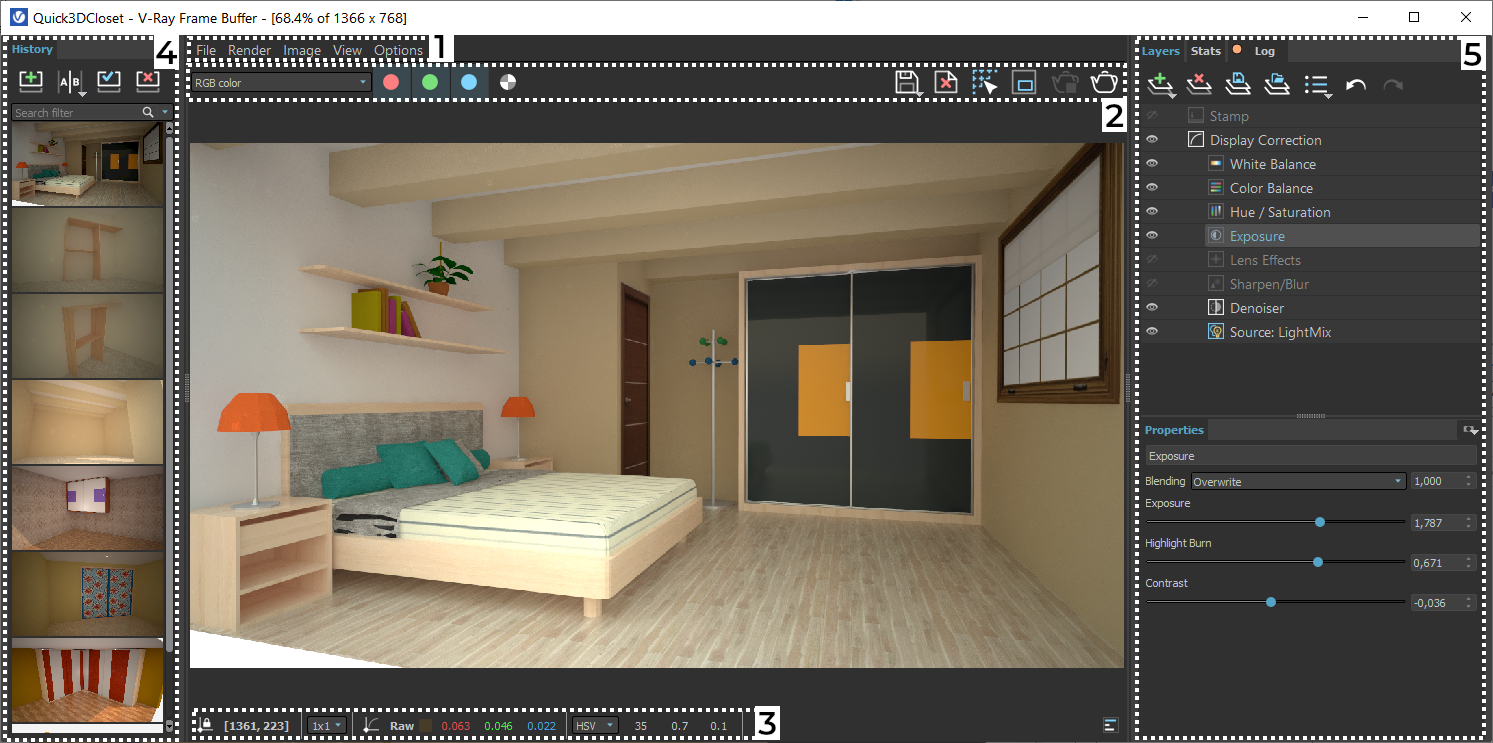
The following options are available in it:
1) TOP TEXT MENU
The text menu at the top of the Quick3DCloset - V-Ray Frame Buffer window contains the main options. Most of these options are also available directly from the toolbar for easy access.
First of all, it is important to note that when a render with medium, slow or very slow quality is generated, a series of independent channels are created that contain render elements such as reflection, refraction, noise, blur, etc. By default, the image is shown with all channels mixed (RGB), but we can see each channel separately. This is useful for professional image editing. These channels are also called layers.
|
Menu |
Options |
|
All the options in this menu are available directly through icons or mouse buttons, with the exception of “Options/VFB Settings”. For this reason, it is recommended to use this menu only for the option “VFB Settings”. In any case, all the options are described below. |
|
|
File |
|
|
Render |
|
|
Image |
|
|
View |
|
|
Options |
VFB settings – Opens the VFB Settings window where you can adjusts settings for Render View, Render Region, History and Layers. |
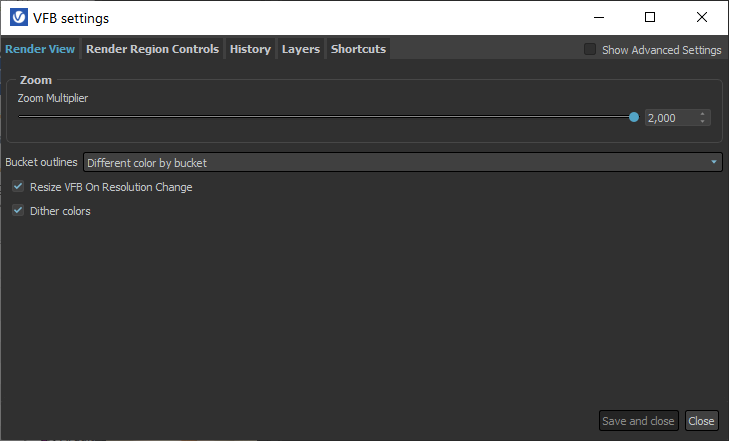
VFB Settings
The settings mainly control visibility, location of stored renders and presets, amount of disk space to use and navigating within the VFB.
Bottom buttons
- Save and close – Saves parameters configuration and closes the VFB Settings dialog.
- Close – Closes the VFB Settings dialog without saving the changes.
Render View Tab
The Render View tab controls zooming, panning and comparing of rendered images. Some of the options are available only when “Show Advanced Settings” is enabled.
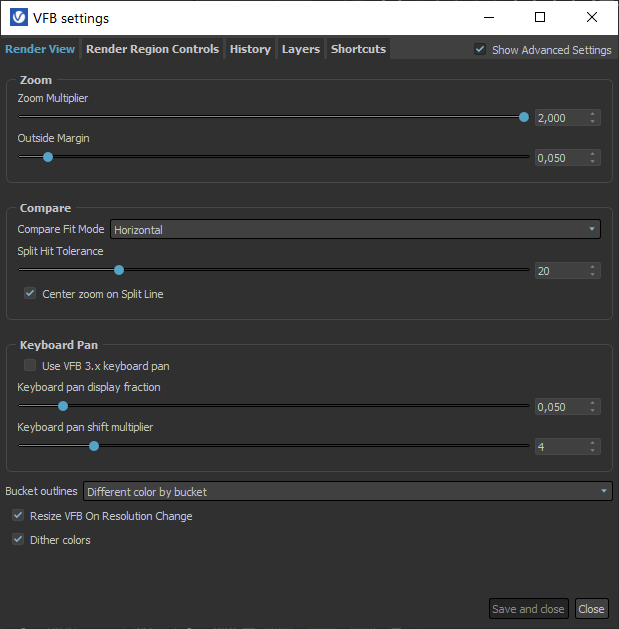
- Zoom Multiplier – Zoom multiplier factor when we rotate the mouse wheel. The default value is 2.
- Resize VFB on Resolution Change – When enabled, loading an image from history or starting a new render resizes the render window to fit its resolution.
The following values are available when the "Show advanced Settings" option located to the right of the tabs, is activated:
- Zoom:
- Outside Margin – The fraction of the displayed region allowed to be outside of the displayed image. Useful when panning the image while zoomed in.
- Compare:
- Compare Fit Mode – Specifies how to fit the compared images when their resolutions are not the same. You can choose between Horizontal, Vertical and Center.
- Split Hit Tolerance – Specifies a number of pixels around the split lines when deciding they are close enough to be dragged with the mouse.
- Center zoom on Split Line – When enabled, zooming in/out, while in history compare mode, is centered around the split position(s).
- Keyboard Pan:
- Use VFB 3.x keyboard pan – When enabled, keyboard pan is in image pixels. When disabled, keyboard pan is in fractions of the displayed image.
- Keyboard pan display fraction – Specifies the number of pixels (or fraction of the image) to pan with the keyboard.
- Keyboard pan shift multiplier – Specifies a multiplier for the pan amount when the Shift key is pressed.
- Bucket outlines – Controls the appearance of buckets in VFB during rendering.
- Different color by bucket – Each core from local rendering machine receives its own color for the bucket outlines and machine name. Each DR render server will have its own single unique color for the markings.
- White – All bucket outlines, names of DR render servers and local rendering machine are in white.
- Black – All bucket outlines, names of DR render servers and local rendering machine are in black.
- None – No bucket outlines and markings are displayed during rendering.
- Resize VFB on Resolution Change – When enabled, loading an image from history or new render start also resizes the VFB to fit.
Render Region Controls Tab
Not available in Quick3DCloset
History Tab
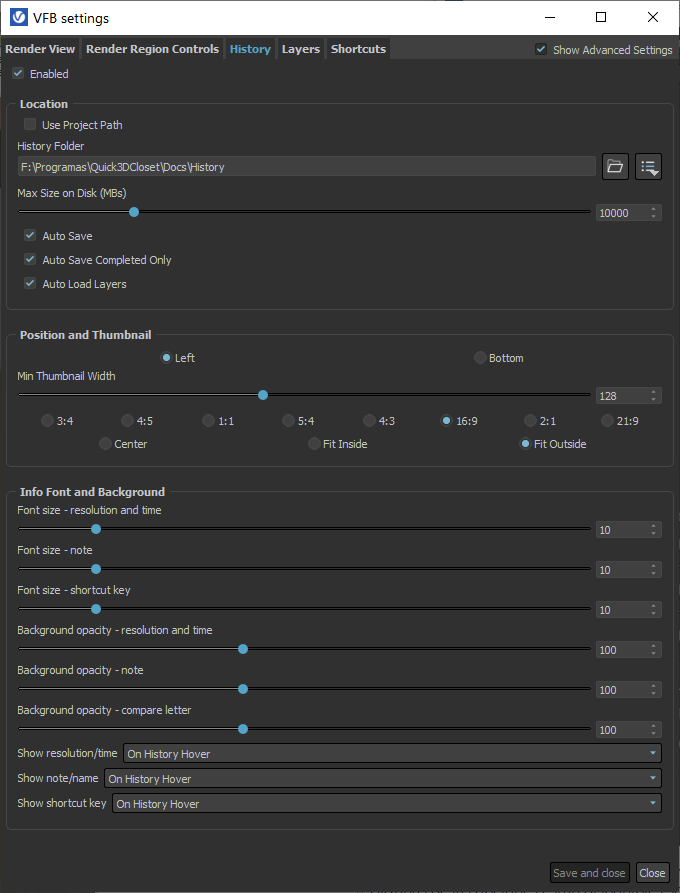
The History tab controls the render history settings such as location, amount of disk space to use and visibility parameters. Some of the options are available only when "Show Advanced Settings" is enabled.
- Enabled – Enables/disables render history, where the V-Ray VFB keeps a history of previously rendered images.
- Location
- Use Project Path – When enabled, creates a new vfb_history folder to use as the History Folder within the current 3ds Max project directory.
- History Folder – Specifies the location where render history images are saved as V-Ray Image files (.vrimg).
- Save – Opens a browser to search for a History Folder.
- Recent – Shows a list of recently used locations for saved render history images.
- Max Size on Disk (MBs) – Specifies the maximum amount of disk space to use for the render history images. When the history exceeds the specified amount, the oldest images are deleted.
- Auto Save – When enabled, all rendered images are automatically saved to the history.
- Auto Save Completed Only – When enabled, all completed rendered images are automatically saved to the history.
- Auto Load Layers – When enabled, loading an image from history also loads the layer tree saved with the image.
- Position and Thumbnail
- Left/Bottom – Specifies the position of the Render History panel.
- Min Thumbnail Width – Specifies the minimum width of the thumbnails in the Render History panel. You can additionally specify the image ratio for the thumbnails.
- Center/Fit Inside/Fit Outside – Specifies how to fit the thumbnail in the History panel.
- Info Font and Background
- Font size - resolution and time – Specifies the font size of the resolution and time information on the thumbnail.
- Font size - note – Specifies the font size of the notes on the thumbnails.
- Font size - shortcut key – Specifies the font size of the 1-9 shortcut keys.
- Background opacity - resolution and time – Specifies the opacity of the resolution and time background.
- Background opacity - note – Specifies the opacity of the note background.
- Background opacity - compare letter – Specifies the opacity of the compare letter background.
- Show resolution/time – Specifies whether to show details about resolution and time of the rendered image. You can choose between Never, On History Hover, On Image Hover, and Always.
- Show note/name – Specifies whether to show the name/note at the bottom of the thumbnail. You can choose between Never, On History Hover, On Image Hover, and Always.
- Show shortcut key – Specifies whether to show shortcut keys on the rendered image thumbnail. You can choose between Never, On History Hover, On Image Hover, and Always.
Layers Tab
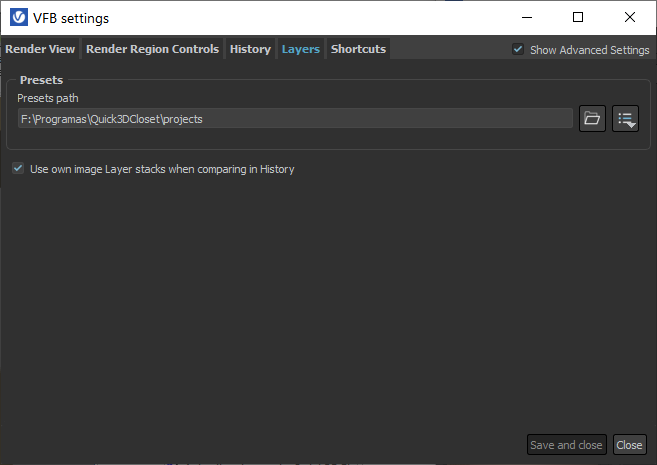
The Layers tab specifies a location to store the layer tree presets.
- Preset path – Shows the path where the layer tree presets are saved.
- Save – Specifies a path to save the layer tree presets.
- Recent – Shows a list of recently used locations for loading layer tree presets.
Shortcuts Tab
The Shortcuts tab displays a table, containing all Shortcuts for navigating through the VFB image as well as controlling the panels of the new VFB. Please note that the VFB window must have the current focus for the shortcuts to take effect.
The shortcut controls available with the keyboard and the mouse are explained below.
2) VFB TOOLBAR
|
|
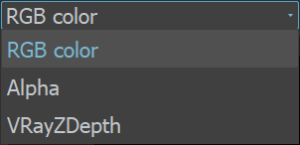
When you render an image in Medium, Slow, or Very Slow mode, Quick3DCloset divides the render into different components such as noise, diffuse, reflection, refraction, each of the lights, and a few others. This allows precise control over every component of the rendered image and is very helpful when editing the image using professional grade applications for editing images. If the render is created in Fast mode, apart from RGB Color and Alpha, the only component available is effectsResult, which allows for the applications of Lens Effects described later on. The default is RGB color. |
|
|
Displays the red channel. |
|
|
Displays the green channel. |
|
|
Displays the blue channel. |
|
|
Displays the Alpha channel (not available in Quick3DCloset). |
|
|
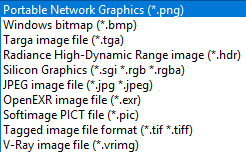
Saves the rendered image in any of these formats:
If you wish to apply lens effects, use the format .vrimag. The remaining file formats are used to further edit the image using professional-grade programs.
|
|
|
Clears the contents of the frame buffer window. |
|
|
Use your mouse to select and pre-render a section of the render. This is useful when you want to see how a particular area of the image renders. This function can be activated by pressing on it at any moment during the render. With this option enabled, you can right-click on the image and select Lock bucket starting point to lock the bucket (or sampling) starting point. |
|
|
Render a specific section of the image (This function is not available in Quick3DCloset). |
|
|
Stop the render currently in progress. |
|
|
Repeat the last render (*Not available in Quick3DCloset). To repeat the render, it is necessary to close the VFB window and click on the render icon on the Quick3DCloset screen. |




3) OPTIONS AT THE BOTTOM OF THE VFB WINDOW: PIXEL COLOR INFORMATION
|
|
When not selected, pixel information at mouse position is displayed dynamically. If selected, it locks the mouse pointer coordinates and displays information for the selected pixel. |
|
|
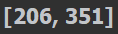
Displays the coordinates of the mouse pointer. |
|
|
Specifies the sampled area size. Click on the arrow to open a context menu with the available sampled area sizes: 1x1, 3x3, 5x5, and 7x7. |
|
|
Shows the sampled pixel values with or without color and display corrections. |
|
|
Signifies whether color and display corrections are applied (RGB) or not (Raw) when showing the sampled pixel values at the current mouse pointer position. |
|
|
Displays the RGB pixel values at the current mouse pointer position. |
|
|
Specifies RGB values. Click on the arrow to open a context menu with the available options.
Depending on the option selected, the values are displayed as follows:
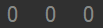
|







4) RENDER HISTORY
The Quick3DCloset VFB keeps a history of previously rendered images, and lists each with a number, thumbnail, and textual details in the Render history panel. Up to four images can be called from the history to be compared in the VFB (as shown below). History files are stored as .vrimg files in a user-specified folder. Render history settings can be configured in the VFB Settings window.
|
|
Enables or disables image A/B vertical comparison. Select images A and B from the render history. |
|
|
Enables or disables image A/B horizontal comparison. Select images A and B from the render history. |
|
|
Enables or disables image A/B/C/D comparison. Select images A, B, C and D from the render history. |
|
|
Saves the current image from the VFB to the render history. The image is placed at the top of the render history list. |
|
|
Loads the selected image from the render history to the VFB. |
|
|
Removes the selected image from the render history. |
|
|
A search field where you can filter the images based on the scene paths and notes. The filter text is selected when pressing the Enter from the keyboard. |



The keyboard keys from 1 to 9 can be used to quickly load the first 9 images from the history to the VFB.
The History panel with notes/name, resolution/time, and shortcut key info displayed. Right-clicking on an image in the VFB history brings up a pop-up menu with some useful options:
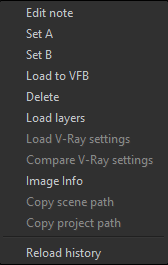
|
Command |
Description |
|
Edit note |
Allows you to add a text comment to the image; the comment appears below the image. |
|
Set A |
Sets the render as A image for A/B comparison. |
|
Set B |
Sets the render as B image for A/B comparison. |
|
Load to VFB |
Loads the selected image in the VFB (same as double-clicking on the image). |
|
Delete |
Deletes the selected image from history. The image is moved to the system's Recycle Bin and can be restored from there if needed. |
|
Load layers |
Loads the layer tree preset of the selected image. |
|
Load V-Ray settings |
Not available in Quick3DCloset. |
|
Compare V-Ray settings |
Not available in Quick3DCloset. |
|
Image Info |
Opens a window containing detailed information about the image, including, but not limited to Camera, Aperture, FOV, Target Distance, V-Ray version, render time... |
|
Copy scene path |
Not available in Quick3DCloset. |
|
Copy project path |
Not available in Quick3DCloset. |
|
Reload history |
Re-reads the history image list. This may be needed if the history folder is updated outside by copying files directly to the folder. Manually saved render images can be added to the History folder, but must be saved to a .vrimg file to keep complete image information.This may be necessary if the history folder is updated by copying files directly to the folder. Manually saved render images can be added to the History folder, but must be saved in .vrimg format to keep complete image information including color correction. |
5) LAYERS
The redesigned Quick3DCloset - V-Ray Frame Buffer includes a suite of color corrections and tools for adjusting the image. The tools are added as layers and displayed in a layer tree. You can enable or disable a particular tool using the visibility icon ( ) to the left of its name.
The following options are available at the top:
|
|
Add a new layer. Multiple layers of the same type can be added. |
|
|
Deletes the selected layer(s). |
|
|
Saves a layer tree preset. |
|
|
Loads a layer tree preset. |
|
|
Quick access to custom layer presets. You must set the path to it in the VFB Settings. |
|
|
Undo various actions related to layers such as create, delete, reorder or modify a layer. |
|
|
Redo various actions related to layers such as create, delete, reorder or modify a layer. |


By default, when Quick3DCloset is installed, the following layers are shown depending on the render quality. As we have seen previously, more layers/effects can be added by pressing the "Add a new layer" button:
|
|
|
|
*Layers available for Fast renders |
*Layers for medium, slow and very slow quality renders |
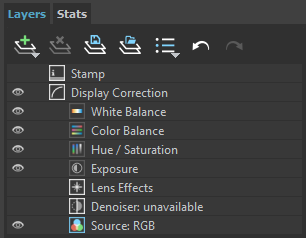
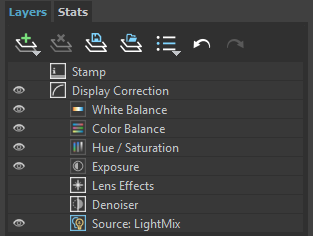
- Stamp: – Allows adding text to the image.
- Display correction: – It is used to modify the exposure of the image. When displaying or hiding this layer, it acts on the rest of the layers shown below:
- White Balance – Correct the white balance moving the dial from a low value of 3000 (cold, bluish image) to a high value of 10000 (warm, yellowish image). Recommended values are typically around 6000.
- Color Balance – Correction allows you to select dominant color between Cyan and Red, Magenta and Green, and Yellow and Blue. This correction can apply to the entire image or can be applied selectively to impact Shadows, Midtones or Highlights.
- Hue/Saturation – Correct Hue, Saturation and Luminosity of the image.
- Exposure – Make corrections to Exposure, Highlight burn and Contrast. These corrections can be applied in conjunction with the Force Color Clamping for better results. The recommended value for Highlight Burn is around 0.75. With lesser values, the image tends to lose volume.
- Lents Effect – Opens the lens effect control panel, explained.
- Denoiser – It does not work with Fast render. Removes noise from the image by blurring the dots. Its value can vary between 1 (maximum blurring, and therefore noise elimination) and 0 (no blurring).
- Source: RGB (for fast quality) or Source LightMix (for medium, slow and very slow quality). The Source LightMi option shows a list with the lights of the render and allows you to modify their intensity (raising or lowering it) and their color.
Each layer has a context menu. Right-click to display it:
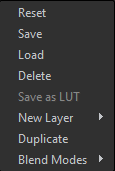
|
Command |
Description |
|
Reset |
Resets all changes done to the selected layer. |
|
Save |
Saves the layer as a preset. |
|
Load |
Loads a preset for the selected layer. |
|
Delete |
Deletes the selected layer. |
|
Save as LUT |
Bakes all the color corrections to a LUT file. |
|
New Layer |
Creates a new layer. |
|
Duplicate |
Duplicates the selected layer. |
|
Blend Modes |
Specifies how the selected layer blends with the result from all layers below it. |
These shortcuts navigate through the VFB image. Please note that the VFB window must have the current focus for the shortcuts to have effect:
|
Mouse |
Description |
|
Mouse wheel |
Zoom in/Zoom out |
|
Double-click left button |
Zoom to 100% |
|
Middle button dragging |
Pan (hand tool) |
|
Ctrl+Shift+Left click |
Zoom in the rendered image |
|
Ctrl+Shift+Right click |
Zoom out the rendered image |
|
Keyboard |
Description |
|
+ / = |
Zoom in |
|
-/_ |
Zoom out |
|
* |
Zoom to 100% |
|
Arrow keys |
Pan left, up, right, down |
|
PageUp/PageDown |
Switch between render elements |
|
F |
Fit region or whole image in the VFB |
|
Esc |
Abort render |
|
Q |
Enable history A/B vertical compare mode |
|
W |
Enable history A/B horizontal compare mode |
|
E |
Enable history A/B/C/D compare mode |
|
A |
View Alpha. |
|
B |
View Blue. |
|
G |
View Green. |
|
R |
View Red. |
|
1-9 |
Load the respective image from the new VFB history |
|
H |
Show/hide history |
|
Ctrl+L |
Show/hide whole right panel |
|
P |
Show/hide only layers tree |
|
S |
Show/hide settings |
|
L |
Locks the mouse pointer coordinates and displays information for the selected pixel, i.e. activates the Lock pixel info coordinates button. |
|
Ctr+C |
Copy the VFB image to the Windows clipboard; the image is copied exactly as it appears on the screen (meaning sRGB/LUT/OCIO etc. corrections are applied). The full resolution image is copied to the clipboard, even if the VFB view is zoomed in/out. |
|
Ctr+Z |
Undo various actions related to layers such as create, delete, reorder or modify a layer. |
|
Ctr+Y |
Redo various actions related to layers such as create, delete, reorder or modify a layer. |
|
|
|