|
|
PHOTO |

This option allows you to create photorealistic images of the design.


Once the project has been finished, proceed to making the render with the lights and perspective you want.
The window below will let you configure the render options:

The available options are:
- Resolution: Increasing the resolution will increase definition. If you select the “Customize” option, you will have to add width and height values manually:

NOTE: To save time, it is recommended to do the tests in low resolution and increase it when the outcome is as expected. If the lines of the door frame are staggered, it will be necessary to increase the resolution.
- Quality: There are 3 available options: Best, Good and Low. The best quality will take more time to render. Below you can see images of the 3 qualities available:
|
LOW / FAST |
GOOD / LOW |
BEST / SLOW |


- Reflection: Here you can increase or decrease the reflection in floors and walls. (NOTE: the reflection value changes the light. The higher the reflection is, the more light the render will have.)
Below you can see two images of the same project: one without reflection and the other with maximum reflection values:
|
|
|
|


- Lights: This option allows you to increase or decrease the lights of the render. (NOTE: If it looks good in "3D mode" but the render is light or dark, it is easier to adjust the lights using this bar. When changing "Quality", it may also be necessary to readjust the lights a bit by using this option.)
- Advanced: This section allows you to configure advanced aspects of the render such as:
- Show ceiling: This option will show the ceiling in the render.
After setting up all the render parameters, click on ( ), and a new window opens (V-Ray Frame Buffer) where the render itself will be created. It may take some time to open the window, depending on the complexity of the kitchen.
This window allows you to:
- See a color render in progress.
- Save the color render, once completed.
- Apply color corrections to the rendered image such as exposure, contrast, saturation and many others.
- See a list of renders created and review past renders individually or two at a time.
- Save information about the rendered images such as time it took and others.
V-Ray Frame Buffer Tool Bars
TOP TOOL BAR

Here are the buttons available in the top tool bar of the V-Ray Frame Buffer:
|
|
When you render an image in Medium, Slow, or Very Slow mode, Quick3DPlan® divides the render into different components such as noise, diffuse, reflection, refraction and a few others. This allows precise control over every component of the rendered image and is very helpful when editing the image using professional grade applications for editing images. If the render is created in Fast mode, the only component available is effectsResult, which allows for the applications of Lens Effects described later on. The default is RGB color. |
|
|
From left to right:
|
|
|
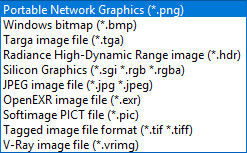
Saves the rendered image in any of these formats:
If you wish to apply lens effects, use the format .vrimag. The remaining file formats are used to further edit the image using professional-grade programs. |
|
|
Use this button to open a previously saved image. |
|
|
Copy the existing image to the clipboard. |
|
|
Delete the current image leaving the render window empty. |
|
|
Use your mouse to select and pre-render a section of the render. This is useful when you want to see how a particular area of the image renders. This function can be activated by pressing on it at any moment during the render. |
|
|
Render a specific section of the image (This function is not available in Quick3DPlan®). |
|
|
Link the image with Pdplayer, a professional image sequence player and viewer. |
|
|
Stop the render currently in progress. |
|
|
Repeat the last render. |


BOTTOM TOOL BAR
![]()
Here are the buttons available in the top bottom bar of the V-Ray Frame Buffer:
|
|
Show correction control: Opens the lateral bar displaying the different correction control options. |
|
|
Force color clamping: Identifies areas of the image that are overexposed to light. If the “burned” areas of the image are extensive, reduce the Exposure value in order to eliminate or minimize them. If the image is not overexposed to light, increase the Exposure value until you see the clamping color appear. |
|
|
Show Pixel information: Opens the window that display the pixel information. The cursor needs to be in the image in order for the pixel information to be displayed. You can also right-click on the image and select Pixel info. |
|
|
|
|
|
Use White Balance correction: Correct the white balance moving the dial from a low value of 3000 (cold, bluish image) to a high value of 10000 (warm, yellowish image). Recommended values are typically around 6000. |
|
|
Use HSL color correction: Correct Hue, Saturation and Luminosity of the image. |
|
|
Use Color Balance correction: Correction allows you to select dominant color between Cyan and Red, Magenta and Green, and Yellow and Blue. This correction can apply to the entire image or can be applied selectively to impact Shadows, Midtones or Highlights. |
|
|
Use Colors Level correction: This correction concerns the contrast by channel R, G or B. |
|
|
Use Colors Curve correction: This correction impacts the tangent to the color curve. To see the tangent lines, click on one of the extremes. The line will be defined by two white points. Select the line and drag it above or below the curve color. When you drag the line above the color curve, the image appears lighter. When you drag the line below the color curve, the image becomes darker. The right tangent line impacts the whites. The left tangent line impacts the blacks. You can right click on the curve color chart to zoom i9n or out, undo the modifications, and save the curve color modifications to be applied to subsequent renders. |
|
|
Use Exposure correction: Make corrections to Exposure, Highlight burn and Contrast. These corrections can be applied in conjunction with the Force Color Clamping for better results. The recommended value for Highlight Burn is around 0.75. With lesser values, the image tends to lose volume. |
|
|
Use Background Image: Allows you to use a background image. (This option is not used in Quick3DPlan®) |
|
|
Use ICC Correction: Click to change the image from RGB to CC. If you press and hold the button you can switch between RGB, ICC and Gamma 2.2. |
|
|
Use LUT correction: Activate or deacctivate the color table between LUT and OCIO. These corrections require a previously configured file. |
|
|
Show V-Ray VFB history window: Opens the image "history window". This is explained later on. |
|
|
Use pixel aspect. This option is not used in Quick3DPlan®. |
|
|
Stereo red/cyan: Activate or deactivate a stereo view of the image. If you click and hold, you can select between Red/Cyan and Green/Magenta. |
|
|
Open Lens Effects settings: Opens the lens effect control panel, explained later on. |
|
|
Show VRay Messages window: This option is not used in Quick3DPlan®. |


To activate the image history window, click this option (![]() ) located on the lower tool bar of the "V-Ray Frame Buffer". The tool bar shown below will be displayed (NOTE: See "Addendum: Activate the render history in the V-Ray render window"):
) located on the lower tool bar of the "V-Ray Frame Buffer". The tool bar shown below will be displayed (NOTE: See "Addendum: Activate the render history in the V-Ray render window"):

The options available, from left to right, are:
|
|
Enable VFB History. The first time you click, the Render history settings window is displayed. Here you need to select the location of the folder where the render files will be stored. These files are vrimag files. You also need to specify the amount of memory allocated to the folder where these render files are saved, for example 10,000 MB. Both the location of the folder and the amount of space assigned can be altered at any point.
|
|
|
Save. Use the Save button to manually save an image to the history folder. This is useful if you want to make a copy of the image with different color corrections for purposes of comparing them later on. Also very useful if you have not activated the automatic save into the history folder. |
|
|
Open. Loads image from history. You can double-click on the image or select the image then click open. |
|
|
Remove. Erases an image from the history. |
|
|
Compare Horizontal/Vertical. Activates or deactivates comparisons between two images A and B. If you hold the mouse, you can select between a side by side (horizontal) or a top/bottom (vertical) comparison. |
|
|
Set A. Select the first image to compare and click on A. The selected image will be identified as A for comparison purposes. |
|
|
Set B. Select the second image to compare and click on B. The selected image will be identified as B for comparison purposes. Upon selecting B, the two images, A and B will appear on the render window with either a horizontal or a vertical dividing line. |
|
|
Swap A/B. Swaps the position of the images. |
|
|
Settings. Opens a pull down menu with two options: History settings opens the "Render history settings window" described above. The second option, Dock History, allows you to dock the history panel on the left side of the render window. Otherwise it can be left as a floating window. |


If you right-click on any of the images displayed in the history window, the following options will become available:

- Edit Comment: You can add a comment to the image.
- Set A/B: Identify an image as A or B for comparison purposes.
- Load: Load image.
- Delete: Erase image.
- Load V-Ray Settings: not available in Quick3DPlan®.
- Compare V-Ray Settings: not available in Quick3DPlan®.
- Image info: Image information.
- Load Color Corrections: Loads color corrections applied to the image. Will alter the values in the Color Corrections panel to reflect the values used when the image was edited.
- Reload History: Reloads/refreshes the history.
Lens Effect
When you click on the button "Open lens effects settings" located in the lower tool bar (![]() ), a new window opens to the left of the render window. This new window allows you to apply lens effects to the lights in your render. To see this effect, make sure you double-click on the image as it appears on the history panel, even if this is the last render you created. Also, make sure you see the “effectsResults” layer selected in the top tool bar.
), a new window opens to the left of the render window. This new window allows you to apply lens effects to the lights in your render. To see this effect, make sure you double-click on the image as it appears on the history panel, even if this is the last render you created. Also, make sure you see the “effectsResults” layer selected in the top tool bar.

The effect only works with "Point lights", and not with directed lights. This means if we want to apply the lens effect to can lights, you should use the category "Ceiling lamps" and not the category "Ceiling lamps. directed light". Also, if the light fixture has a material with self-illumination, the self-illumination value needs to be changed to zero or the material itself changed for another one with 0 self-illumination. To verify this aspect of the light fixture, right-click on the light fixture and select Information to see the materials that apply to the fixture, then go to Edit Materials and select them to verify that self-illumination is zero.
Render Window Background
You can alter the size of the image in the render window by rolling the mouse wheel. When the image is small, a background color is visible. If you right click,you will see a menu with the default color plus 5 additional background color options you can select from.
NOTE: If you click on the render button during a "2D view", the window below will appear:

NOTE 2: Clicking on the "Photo" option with the "multiple window" mode will ask you which one you want to "render":

|
|
|


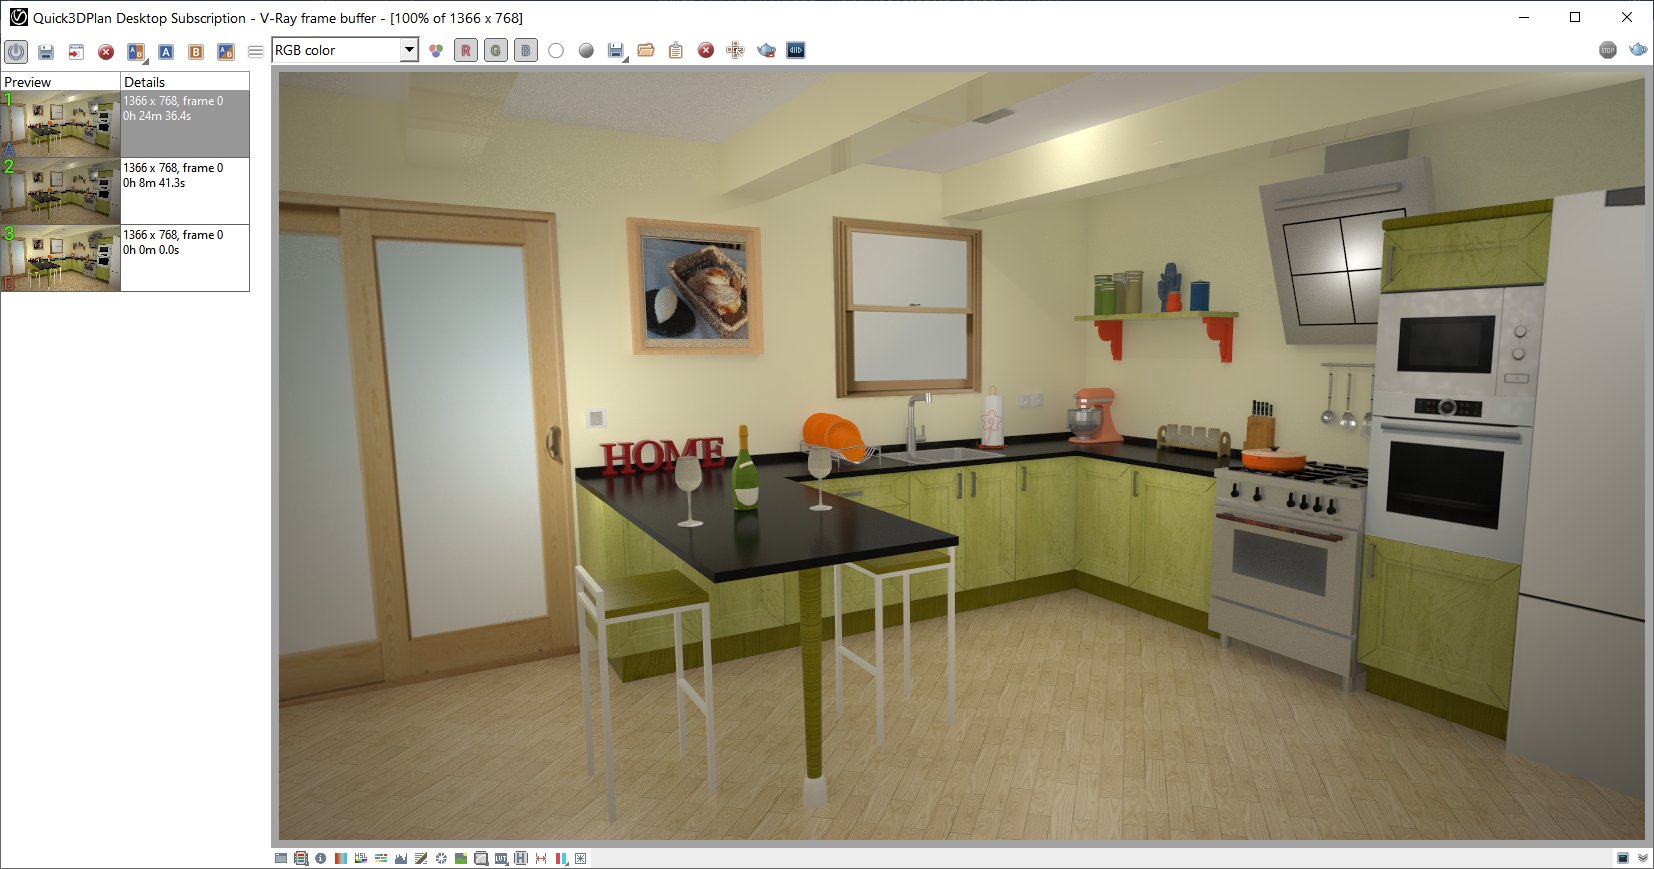
When you click on this button, the following window will display with all the "renders" made to compare the parameters and the final result. Notice that once the project has been closed, this list will disappear, so you may have to save the render(s) you want. (NOTE: If no render has been made, the window will not be displayed):

Here you can find the following options:
- List of images: A list with all the renders made and their parameters (quality, resolution, lights, etc) will be shown on the left.
- Preview: A preview of the selected render will be shown on the right.
- Save as, edit and remove image buttons: Here are the commands to edit, save and delete a selected image:
|
Once edited, click on the "Accept" (
|
|
|
|
|


- Zoom buttons: These commands allow you to increase or decrease the image size in the preview [2]:
|
|
|
|
|
|
|