|
|
ADD TEXT |
Here you can find the tools to insert, modify, move and delete texts in 2D view.
This icon allows you to insert text in your design.
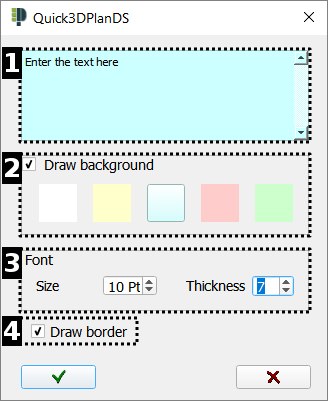
When you select this option, the following window appears:

Here you can find the options below:
- Introduce the text you want.
- Here you can select the background color.
- Here you can select the font size and thickness.
- Finally, select whether you want a black frame or not.
Click on the green check mark and the window will close. Place the text with the mouse in the design.

This option allows you to modify text that has been previously inserted in the design. When clicking on this icon, Quick3DPlan® DS shows the message "Select object or press ESC to cancel...". After selecting the text, a dialog box appears allowing you to change the text and the background color. (NOTE: You can also modify text by double clicking on it.)
This tool allows you to change the position of the selected text. Once you click on this icon, the message "Select object or press "ESC" to cancel..." appears. Next, select the text you want to move by holding the left mouse click and place it in the new position.
This command allows you to delete text. When clicking on this button, Quick3DPlan® DS shows the message "Select object or press ESC to cancel...". After selecting the text, the following message appears asking you to validate your choice.


