|
|
TOP FROM SHAPE |
Here are the tools to create, modify and erase worktops with a selected shape.
This command allows you to use a selected "shape" to create a worktop. This window will appear if there is no shape. After clicking on "OK", the "Draw shape" tool will appear:

Once the shape has been drawn, the message "Select object or ESC to cancel" will appear. When a shape has been selected, you will be able to set the features for the new worktop, such as "thickness", "elevation" (distance from the floor), "material" and "erase the shape" after creating the worktop:

After this, click on ( ) the worktop will be created automatically. This is a simple and easy way to create a "breakfast bar" from a shape:

This option allows you to modify the features of a worktop created from a shape. After selecting a worktop, the following window will appear where you can modify its features (NOTE: You can edit the worktop by double-clicking on it).

Click on ( ) to apply changes.
After selecting a worktop, the following window will appear:

The image on the left represents a floor plan view of the element, a worktop from a shape in this case, and four buttons to move it to the left, right, backward or forward. The image on the right represents a front view of the element with two buttons to move it up or down. Introduce a value and click on one of the arrows to move it.
NOTE: Press the left button of the mouse to move a worktop from a shape. Release it to place the worktop in a selected position.
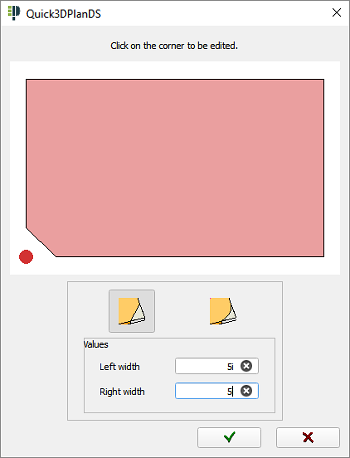
This option allows you to make a "curved cut" or "diagonal cut" in the worktop.
Message "Select object or ESC to cancel", will let you select the worktop you want to cut by clicking on it. Cutting options are:

A window will appear where you will be able to select the corner to be cut (marked with a red point) and select the type of cut and its measures:
|
|
|
|
|
To undo a cut, click on the corner and deselect "the type of cut" button to eliminate it.
NOTE: If we try to use this tool on a countertop that already has a "sink cutout", the following message appears advising that it is not possible:

This tool is used to make a sink cut-out on a counter top. This is only needed when the sink is placed manually. After clicking on this option, the message "Select sink..." is displayed next to the mouse, and once this is selected, a new message "Select countertop" is displayed so that we can point to the countertop to be cut. Once both items are selected, the countertop will be automatically trimmed. (NOTE: If you move the sink and make a new "cut out", the old cut out is deleted automatically.):

Use this command to rotate a worktop from a shape.
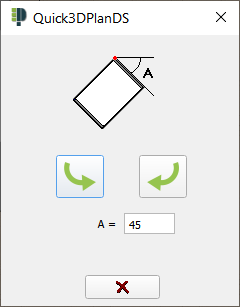
The message "Select object or ESC to cancel" will appear. Select the worktop to be rotated by clicking on it and Quick3DPlan® DS will show the next dialog to rotate it:

Introduce the value of the angle to be rotated in box "A = ".
Use the arrows to rotate it in either direction around its rear corner.
Use this command to erase a worktop from a shape.
The message "Select object or ESC to cancel" will appear. Select the worktop from a shape to be erased. After that, Quick3DPlan® DS will show the next dialog:

Click "YES" to erase it or "NO" to cancel.


