|
|
ADD CLOSET |

Here are the tools to insert, modify and delete the wardrobes.


This command allows the creation of wardrobes in order to insert them in the design. By clicking this button, the following window will show up where parameters like measures, doors, materials and moldings can be defined.

After setting up the wardrobe structure, the next step will be the definition of the wardrobe interior (drawers, shelves and accessories, among others):

Overall, both screens have similar buttons:
|
|
|
|
|
|
|
|


Next there are more details about every available option in the wardrobe design window:
- Project parameters
- Default parameters
- Structure
- Doors
- Mouldings and End Panel
- Distribution of the elements
|
|
|

This option allows editing a wardrobe previously inserted. By clicking this command, the message "Select object to change" will appear. Click on the wardrobe and the wardrobe insertion window will open up. (NOTE: the wardrobe can be modified by double-clicking on it without previously selecting this command).
The program will make changes when clicking on the "Accept" button ( ).
).
|
|
|
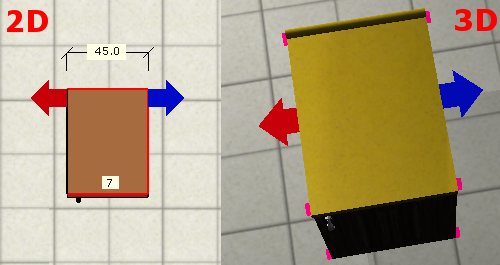
By clicking this command, message "Select wardrobe or press ESC to cancel" will appear. In order to move the wardrobe you just have to click on the wardrobe and the dialog to move the wardrobe will appear, then it is necessary to set the space to move.

Inside the dialog, left image represents a standing wardrobe and four buttons to move the wardrobe forward, backward, left or right. Image on the right represents the front view of a wardrobe with two buttons to slide up and down. In order to move it, you just have to insert the value in the section over the furniture and click on the correspondent arrow.
Wardrobe position can not be in the dialog's place. To help you understand the direction the wardrobe will move, a coordinate system design appears with blue and red edges as references.
|
|
|
This command makes rotating the wardrobe possible.
By clicking this command, message "Select wardrobe or press ESC to cancel" will appear. After selecting the wardrobe to rotate, program will show a dialog to perform this action.
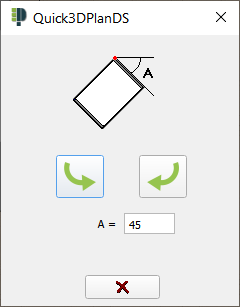
Inside the dialog, section with value "A = " will appear, that indicates the angle to rotate. Notice that every inserted value will mean an increase in the current position of the wardrobe.
Those two arrows are made to rotate the way of the wardrobe taking as a reference the left back corner.
|
|
|
This option allows you to delete a wardrobe previously inserted.
By clicking this command, the message "Select object to delete" will appear. Click on the wardrobe you want to delete. After that, the program will delete the selected wardrobe.

Click "YES" to delete the wardrobe or "NO" to cancel the action of deleting.
|
|
|